Although drywall is a resilient surface, it is common to need to patch holes from time to time. You might have moved a wall hook to where a photo was once hung or accidentally bumped into the wall while installing a new appliance. It is easy to fix. These patches can be used to repair any size hole, large or small. You should ensure that the surface you are repairing is smooth and clean. Trim any frayed edges of the hole with drywall. Smoothen the surface using 100 grit Sandpaper, 120 grit Drywall Sanding Screen, or a Medium Grit Sanding Sponge. An Extra Large Sanding sponge is recommended. This sponge is large enough to sand large drywall surfaces. Any imperfections that are not fixed before patching or painting will be visible. Because sanding is a process that involves the removal and collection of material, it can create airborne dust. Safety glasses, work gloves, and a dust mask are recommended. Few products are more versatile or easier to use when it comes to minor repairs to drywall than adhesive-backed mesh reinforcement tape. Start by cutting a piece of tape. Then apply the tape over the hole, so the mesh extends 1″ beyond the hole. Apply another layer of mesh tape at 45 degrees to the first and press firmly. Use a compound spreader or drywall knife to apply a smooth layer. The blade or spreader should be held at a 45deg angle to your surface. Spread enough joint compound to cover the mesh reinforcement tape. Fill in any voids behind the tape with the combination. Taper the joint compound to the mesh reinforcement by 2-3 inches. Smooth edges are better for sanding later. The temperature and humidity will determine how long the joint compound should dry. Run a piece of sandpaper on top of the joint compound to check if it is dry. If the surface is too soft or has a ball, it’s not ready for sanding. After the surface has dried completely, sand it by hand with an 80-100 grit or 120 grit screen or medium grit sponge. You may use a rubber block to support your sandpaper when hand-sanding large areas. This will ensure that the surface is flat. To avoid damaging the site, be careful not to press the sandpaper into the hole. Instead, sand the entire area in one continuous stroke. Apply the second coat of joint compound the same way as the first. The second coat should be smoother than the previous one. Wait 4-8 hours for the combined compound drying. After the joint compound has dried completely, smoothen it with a 100, 120, or 150 grit screen or Fine sanding sponge. Make sure to smoothen the outer edges of the joint compound so it blends in with the wall. Use a microfiber or clean cloth to remove dust from sanding. If you use water to clean the wall, it must dry completely. Otherwise, the moisture could get trapped in the paint, causing bubbling and other problems. After the surface has dried, you can repaint the exterior or restore it to match the rest. It’s never been easier to repair a hole in your drywall! With the Insta-back drywall fastener, the Prest-On Drywall Repair Kit makes it easy to remove and reattach any size piece. Attaching the fasteners to an existing board provides a solid backing-up surface to reattach the replacement piece. Insta-backs have scored tabs that separate, so no metal is exposed. Insta-backs make it easy to measure and cut quickly and save time and money on your next repair or patch. As a first step in covering the hole, drywall patch kits include a type of mesh available in different sizes. Royal Palm Beach Popcorn Ceiling Removal & Drywall Services say that you should remove any drywall pieces or jagged edges and use a piece mesh to cover the hole by approximately 1 1/2 inches. You can place the patches on the wall like a sticker using a pre-applied adhesive. A container of pre-mixed or mud and 6-inch and 12-inch steel putty knives are required. Plastic is not flexible and can leave marks when applying the joint compound. They say drywall repairs can look amateurish because people don’t adequately spread the joint compound from the patched areas. Load the 6-inch knife with about 1/2 cup of mud to make your first pass. Then, pull the blade against the wall to apply the glue. You want the first coat to cover the mesh on all sides. Smoothen it as much as possible, as bumps may need to be removed eventually. It should dry overnight. You should not rush the process or make it dry faster. Otherwise, it will crack. Use the 12-inch putty knives the next day. Use the cup of mud to coat the blade. The knife should be drawn down the wall, covering the area plus a few inches around it. Allow it to dry overnight. Use a 100-grit sanding pad to smoothen it. Do not use back and forth motions. You could damage the mesh by removing too much of your repair. Start at the edges and then work your way into the middle. Apply a third coat with your 12-inch blade to smooth any uneven surfaces. Allow to dry overnight and then sand the next day. To remove the sanding dust, use a rag or tack cloth. To cover the patch, apply one coat of primer followed by two coats of paint (or paint that contains primer). Let dry between coats. Wall texture can be achieved by rolling. A small roller is better than a paintbrush and will create a different look. If you have any leftover paint, the paint store should shake it to ensure the pigments are well mixed. To hide the patch, paint the whole wall if you need to purchase new paint. Paint your patch with paint. Start rolling at the center of the repair. You will notice a decrease in paint on your roller. Now, you can move to the edges and apply a thinner coat of paint with the almost-dry roller. This is known as “feathering-in,” and it helps the paint blend better with the wall. Apply more pigment in the middle where it hasn’t been painted before and less towards the edges where there is paint. Once the first coat is dry, use a dry roller to cover the area while it is still damp lightly. This will replicate the texture on the wall. The repaired area will be silky smooth compared to the rest. Therefore, using a dry roller can give it a similar texture. If you are unhappy with the job, you can go back to the sanding step and try to smoothen the edges again. This repair will take approximately two hours and cost about $50 in materials (plus paint). You can add an essential skill to your DIY home repairs skills. It is straightforward to repair any damage less than 1/4 inch in diameter or depth. However, you will need to do this after the first coat of paint. It can be challenging to spot tiny imperfections in drywall on dirty walls. This is why we first paint the wall before we repair it. We want to ensure that all repairs are done. Repair: Fill the small holes with lightweight spackle. After the first coat has dried, apply two coats of spackle. Apply two coats of spackle and sand the surface with a fine sanding brush. It is crucial to prime any minor repairs after sanding so they don’t show through the final coat of paint—Prime with a brush, not a roller. Using a roller to pull out the spackle could damage your minor repairs. Apply your topcoat lightly with a brush. After the paint has dried, apply it to your walls. Although the repair will appear smooth, the texture of your wall will be matched by the roller stipple. Ever had a piece of furniture, a washer or dryer delivered, and then discovered that the delivery men made indentations on a wall? Children can hack walls that are drywall-covered. As quickly, the housekeeper maid can cause damage. Drywall expands and contracts with temperature. It cracks when it settles. Wet drywall falls apart readily. Fido, the family dog, can cause damage to drywall by digging a sharp claw into it to try to squash the innocent fly that landed to rest before taking off on its next adventure. Drywall Patch/Spare Drywall – Any holes larger than six inches will need to have new drywall installed. You can purchase drywall and have it cut to your specifications. You can also keep spare pieces of drywall after you finish a project. Ask your contractor if you can keep any extra material if you did not do it yourself. Although you don’t want to fill your basement with drywall, having a few pieces around can be helpful. The Drywall Saw/Jab Saw is more accessible than plugging an irregularly shaped or jagged hole. Removing drywall can make repairs easier to spot and more uniform. Drywall saws can be used in tight spaces and easily cut through the material. Before making any cuts, be careful and use eye protection. Joint Compound – This is the material that hides and holds the seams in your drywall. You can mix the joint compound with water or as a pre-mixed powder. This compound can repair larger areas or join two pieces of drywall. Sandpaper: After filling the hole with a joint compound or spackle, you must sand it. You can use 150-grit Sandpaper to smoothen any spackle. You can also find specially-designed sandpaper sponges for spot repairs to drywall. We offer the above services at the following locations within Royal Palm Beach:
If you are located in Palm Beach County and you don’t see your city/area listed above, don’t worry! We cover all of Palm Beach County. Fill out the contact form above or CLICK HERE and send us a message. We’ll get back to you asap!
Drywall Repair
Contact Us

Preparing the Surface
Safety considerations
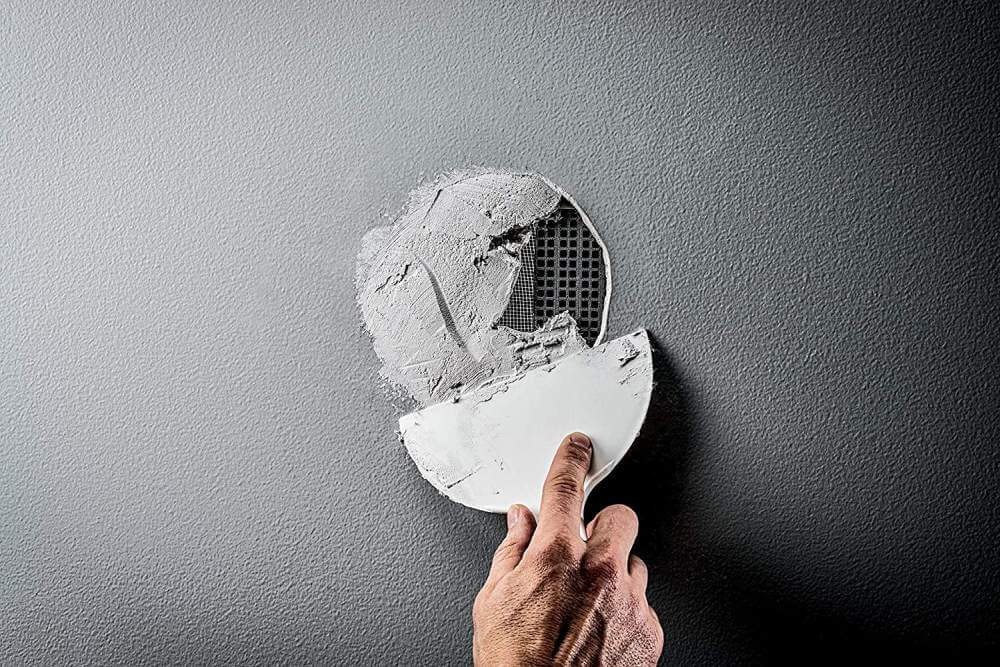
Use Mesh Reinforcement tape.
Apply Joint Compound

Sand Joint Compound
Apply Second Coat of Joint Compound
Sand Second Coat
Maintain a Clean Surface
The wall is called “Mud.”
Paint the patch.
Drywall repairs are less extensive:
Locations We Serve